How Do You Create a Tech Pack? (Part 4)
- kristen anderson
- May 7, 2020
- 6 min read
Updated: Jan 20, 2023
The shortest and simplest answer? You don't.
If you're an early-stage entrepreneur and this isn't your area of expertise, it is far easier, more efficient, and more accurate when you hire someone like our studio KRSTN NDRSN to help you instead.
It's easy to get sucked into the mindset that you, as the founder, need to learn/create/do/experience everything about everything in your business. This isn't the way successful long-term companies operate, so don't get caught up in the concept that you need to become a tech pack creator yourself.
Part of the reason you might be better off hiring help vs. going at it alone is that it's exceptionally easy to miss something small that cascades into the rest of the product.
So many parts of a tech pack are highly relative to other pages and aspects. You might not even realize the mistake you had made until you get a sample back, and multiple elements are wrong or don't 'work' together. Using a design company or freelance apparel designer that truly understands the way the product goes together will likely move the needle forward in a more meaningful way.
However, if you're super committed to the DIY route - start by finding someone that can create the detailed technical sketches for you. Once you have these ready and in hand, you'll have a lot more room to advance it further.
You might also want to invest in buying several samples that can show off the techniques you want to use, use similar materials, or help you get product dimensions so you can adequately spec out the garment. They might be helpful to include as images in your tech pack too. All of these can be super helpful in getting started, and seasoned professionals use reference materials, so don't feel like it's cheating, or like you have to make everything up as you go.
Begin with just one page at a time, and try not to get too overwhelmed. Start with the sketches page first and filling out all the essential info to get started. In the tech pack that I'll be putting on the site in the future, many areas of information will be linked to future pages so that the information cascades forward into the applicable sheets.
How do you start smart with your tech pack? Set up your tech pack sheets to let excel work smarter and leverage the appropriate information from the base you can apply the cell data to other sheets as necessary without straining your brain!
LESS BRAIN STRAIN.
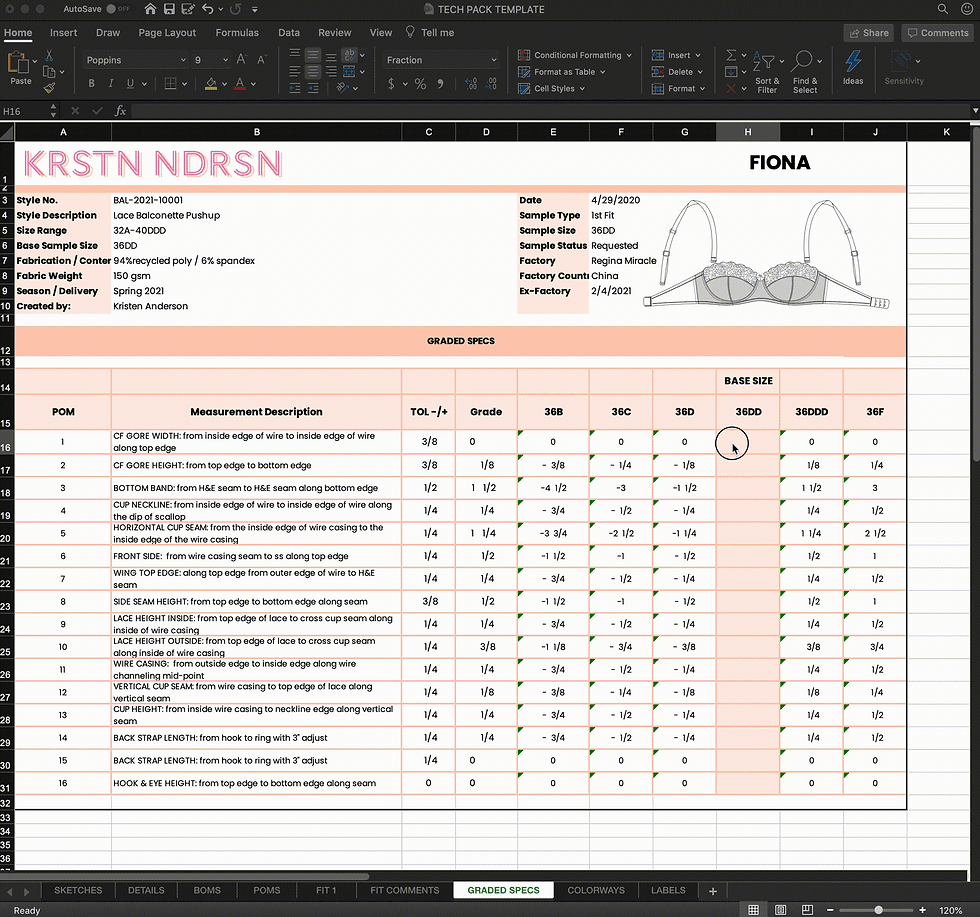
Okay, but really. This is one of my favorite formulas, and it's silly easy. This formula pulls the data from a cell in one sheet and tells another sheet what is there. All instances where this formula exists are updated at once whenever the main cell is changed. For example, in the below tech pack, the entire header section row 3 to 10 is all linked on to my first page, SKETCHES. I added this formula to the same spot in the header for all my sheets. When I need to make any adjustments, they are all made in the SKETCHES tab. The rest of the file cascades all the info to the rest of the sheets in the excel file.

PROTIP: You can copy this formula just like any other, by dragging the little corner at the bottom right of the cell. Double-check to make sure it copied the right cell or information!
Open the tech pack you're working with. Click on the cell you want to add to this formula. This is the cell pulling the information that will be updated when you update the main cell. Once you're in the cell you want, add the equal sign to start the formula.

In our example, we are going to pull from the 'SKETCHES' sheet, specifically calling to the information in cell H1. By using the formula "=SKETCHES!H1" you are telling excel to show the same information from the SKETCHES sheet, specifically cell H1. In this example, we're pulling the style name into this cell, which is FIONA.
If we were to start with this as a starting point for a future tech pack, we could just change the style name on the first sheet and again, it will apply to all of the remaining sheets.

To link a sheet with a space in the sheet name, you must wrap the name with apostrophes, like this: ='FIT 1'!E16.
The easiest way to use this formula is to have excel do it for you. Start building the equation in the sheet using the equal sign, and then move to the sheet and click the cell you want to harvest your information from, and hit enter. I use this formula in multiple areas of tech packs, but a great way is linking the specs from the fit specs tab to the final graded tab under the 'base size' specs.
By linking these cells, you remove duplication of work, and you also ensure much more accuracy and consistency throughout. You have to be aware of them and make sure they are linked to the correct cells, but it's much easier than updating every page on its own!
Crazy to work smarter instead of harder, right?
After you fill out the basic info and the sketch page, move on to the next. Add your inspiration images, close-up pictures of details that you want to include, material photos, and construction images. If you haven't already started doing this, I recommend creating several folders to organize your inspiration and other files so that you're not looking all over the place at this point.
Continuing to go one page at a time, fill in as much as you can that you are confident about. You know how you want your item to be, so really look at it from every angle if you can. For the BOMs and detail pages, include images (they are worth more than 1,000 words!), especially if you're not able to articulate precisely what you mean.
If you're going the self-made route, prioritize the sketches, details, BOMs, POMs, and fit specs for your first tech pack. Consider adding the other tabs after you see your prototype samples.
If you can gather that much together and share it with a factory, continuing to build your tech packs is the same kind of journey, and you take it one page, one style, one concept at a time. Once you see your first samples, you'll have a little more confidence in your own abilities, and it can give you the courage to keep going.
We are a work in progress, just like your tech packs. Just keep iterating.
WHAT DO YOU DO WITH IT ONCE YOU HAVE IT?

Let it fly free!
No, just kidding. Hopefully, you are nearly in a position to send it to a factory! A lot of parts of this process can be done in tandem. If you've been vetting factories all along, then now it's time to send it out. If you haven't been doing that, then that is your next step!
Before you send it out, look over every page thoroughly and double-check for errors and inconsistencies. There are a lot of points of data in these documents. I often check my tech packs 2 or 3 times to give myself the most accurate and on-point tech packs! Being detail-oriented here is a great skill set to pull off. I love sitting on a tech pack for a day and looking at it with fresh eyes in the morning to really make sure it's ready.
I recommend sending your tech packs to 3 to 5 factories at first to cost before sampling. This will give you a better idea of where they land, so there is no sticker shock later on in the process. If you have a multi-piece collection, start with just having them cost one or two of your more complicated pieces. You don't want to overwhelm your potential partners, or they might not want to become partners with you at all.
After getting prices that feel good to you, decide on the factories you want to proceed with and ask them to start making your first samples. If you can afford to sample with your top 2-3 factories, I highly recommend it. Adding this extra step to the process can add a little bit of red to your bottom line, but it can also give you more confidence when you move on to finalizing your factory for the first delivery.
And then it's a waiting game. Sample time varies, but generally, you'll be expected to wait anywhere from 3-6 weeks for your samples to be made up. They might use substituted fabrics, laces, and trims, but if you're eager to see your product, you'll look past all that!
So now, you wait.
Want to learn how to create factory-ready garment tech packs?
Sign up for the Tech Pack Toolkit course today! Learn more below. 👇👇👇


Comments